|
Harvest Plans Map Viewer (HPMV) |
|
|
Questions and/or comments about the Harvest Plans Map Viewer may be submitted directly using this email link. geoinfo@novascotia.ca |
Help |
Table of Contents
2 Request Pre-treatment Assessment (PTA) Information
1 Overview
The Harvest Plan Map Viewer is a mapping tool developed by the Nova Scotia Department of Natural Resources (DNR) that provides easy access to Crown land harvest plans and enables the user to provide comments or request pre-treatment assessment data for the harvest plans.
|
Disclaimer |
|
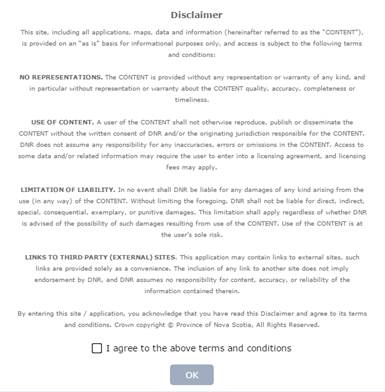
When a user first enters the site, the Disclaimer will be presented. By clicking the check box “I agree to the above terms and conditions”, you accept the use of the web site with the terms and conditions as set out in the disclaimer. |
|
Screen Overview |
|
Once the user acknowledges the Disclaimer, the site will open with the Province of Nova Scotia centered within the window.
The image at left shows the main components of the viewer and identifies the key functions and features available to the user. |

2 Request Pre-treatment Assessment (PTA) Information
|
|
|
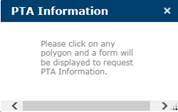
When the user clicks on the PTA icon to request PTA information for a specific planned harvest area, a PTA Information popup window will appear, requesting the user to click on the specific planned harvest area.
|
|
|
|
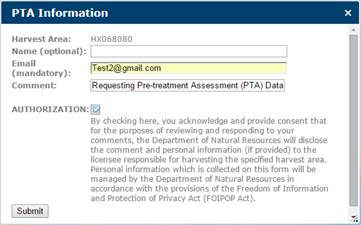
After clicking on the desired harvest area the PTA information form will be displayed. The user must provide a valid email address, check the Authorization box and click on the Submit button to request the PTA information.
|

3 Provide Comments
|
|
|
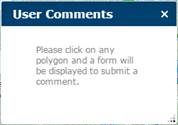
When the user clicks on the Comments icon to provide comments for a specific harvest area, a User Comments popup window will appear requesting the user to click on the specific harvest block. Comments could be provided only for areas that are open for consultation.
|
|
|
|
After clicking on the desired harvest block the User Comments form will be displayed. The user must enter comments, check the Authorization box and click on the Submit button to send the comments.
Important! Name and email are optional fields. Please be advised that without your email address, you will not receive a response to your comments.
|


4 Left Widget Tool Bar
4.1 Layers
|
|
|
The layers listed in the table of contents are available for display by clicking the check box next to the layer you wish to see. Individual layers can be turned on or off this way.
If you click on the layer name, it will expand to show the legend for that layer. The legend shows the colours and symbols used on the map for that layer. In the image shown at left, the Crown Land Harvest Plans layer is expanded to show the legend. The Nova Scotia Roads, Crown Lands and Protected Areas layers are collapsed.
Not all layers are visible at all zoom levels. Some layers are scale dependant and will turn on or off depending on the display scale of the map.
|

4.2 List of Layers
|
Layer Name |
Description |
|
Harvest Plans |
Displays the planned forest harvest areas on Crown land in Nova Scotia. |
|
NS Roads |
Displays the Nova Scotia road network simplified. |
|
Crown land parcels, administered by the Nova Scotia Department of Natural Resources. For more information on Crown land, refer to novascotia.ca/natr/land/ |
|
|
Protected Areas |
Wilderness Areas and Nature Reserves under the administration of Nova Scotia Environment. For more detailed information on Nova Scotia’s protected areas, refer to novascotia.ca/parksandprotectedareas/ |
4.3 Navigation
|
|
Zoom In/Out Buttons
Home Button
Find My Location Button |
Zoom In/Out will incrementally zoom the map in or out with each click.
Home Button – sets the map to the full extent (returns to the full map of NS and centres the map in the window.)
Find My Location will place a marker pin on the map at your current location. (Requires a data plan Wi-Fi or cellular phone to operate.) |
|
|
|
|
|
Keyboard Short Cuts |
Navigation ‘Hot Keys’ |
Pan – Click – Drag To move the map, click and drag the left mouse button and drag the map to a new place. Zoom In – Shift + Click - Drag This allows the user to draw a zoom in box. Zoom Out – Cntrl + SHIFT - Drag This allow the user to draw a zoom out box. Mouse Wheel Zooms In and Out
|
4.4 Draw and Measure
|
|
|
The Draw and Measure widget allows the user to place graphics, text and measurement information on the map face prior to printing. It provides basic "sketching” and “redlining" functions to mark up the map.
When the widget is initially opened, the user is presented with the following 11 drawing tools. From left to right, they are: § Point § Line § Polyline § Freehand line § Triangle § Rectangle § Circle § Ellipse § Polygon § Freehand polygon § Text
Once you select a drawing tool (e.g. Line), choose a Colour, Line Style, Transparency and Width. A Preview of the options you selected will be displayed at the top of the window. If you would like to include measurements for the feature you draw on the map, select Show Measurements.
Click and drag your mouse on the map to start drawing the line, rectangle, etc. Let go of your mouse button to finish drawing the feature. You can add multiple shapes and text to the map before you print it.
|

4.5 Enhanced Locate
|
|
|
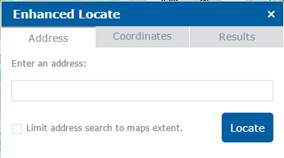
The Enhanced Locate widget allows the user to search for a location by civic address or by coordinates.
To search by Address, enter a street number and/or street name and/or municipality name, etc. If more than one location matches your search criteria, the results are listed on the Results tab. You can click on each result to zoom to the location on the map. By checking the “Limit address search to maps extent” box, you can limit the address search to only what is displayed on the map.
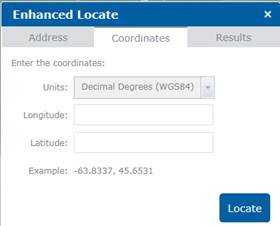
To search by Coordinates, select your preferred Units from the drop down list and enter the coordinates in the fields below.
|
5 Identify
|
Identify
|
|
The Identify function allows you to click on any feature on the map to view relevant attribute information for it. A pop-up window will be displayed and the selected feature will be outlined whenever you click on a map feature. |

6 Top Widget Tool Bar
6.1 Legend
|
|
|
The Legend describes what each colour or symbol on the map represents.
Some layers are scale dependant and will turn on or off, depending on the display scale of the map. The items shown in the Legend will change as the map scale changes, with more layers becoming visible as you zoom in, less as you zoom out.
Use the scroll bar on the right side of the Legend to move up or down and see the full list of layers and items in the Legend. |

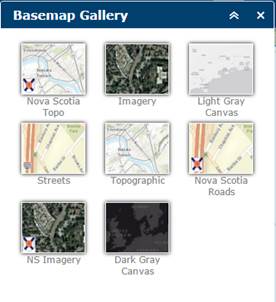
6.2 Change Base Map
|
|
|
Choose between various base maps. The most commonly used base maps are: · Topographic · Imagery · Streets
Topographic will present the user with a detailed topographic map behind the DNR data. The topographic mapping will increase and decrease in level of detail as the user changes the zoom levels.
The NS Topographic base map is maintained by the NS Geomatics Centre and has a greater level of detail than the Topographic base map, which is maintained by ESRI.
Imagery will present the user with air photo satellite imagery behind the DNR data. The level of detail varies in different locations, with urban areas having higher detailed photography.
Two different imagery base maps are available: NS Imagery is maintained by the NS Geomatics Centre. The other Imagery service is maintained by ESRI, separate from the provincial data.
Streets is a comprehensive street map that include highways, major roads, minor roads, direction indicators, water features, cities, parks and landmarks. This base layer is maintained by ESRI. |
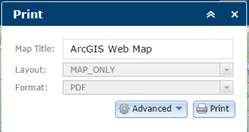
6.3 Print
|
|
|
The Print widget allows the user to print a map with all the information displayed on the screen using the local print drivers.
The Layout drop down list allows you to select from various page layout options (e.g. Letter or Tabloid page size, Portrait or Landscape, etc.). The Format drop down list allows you to select from various output file formats such as PDF, JPG, GIF, or EPS.
The Advanced button allows to set additional features such as the map size, print quality, or include a legend. |